Saturday 29 October 2016

3 Tricks and a Treat

Hi all and Happy Halloween!
 
I thought I would share some more doodles with you by way of a treat and a few, well 3,  last minute tricks you could craft for your Halloween celebrations!
 

So the first thing you need to go is go and grab my spooky doodles, the instructions for download are here in my Autumn Freebie post (I don't want to keep boring you with them if you've been here before!) and you can download the MJM Design Studios - Spooktacular Freebies here.

If you don't have Craft Artist you can use them in any graphics programme you want or download the FREE Craft Artist compact to complete the projects I am sharing.

1st trick - Paper lanterns!


Follow the instructions on my Autumn Freebie post here to convert the doodles into digi embellishments. This time have your blank page set up set to an A4 landscape page.


I have then added papers from my La Senora Mexicana digikit to make my own background paper with my doodles.


I added the bat, repeating it with the stamp mode tool and then turning the individual embellies while selected and using the ball tool at the top of each.


I added some smaller bats and dropped the transparency on some of them (using the transparency slider on the right hand side under the colour box) and also re coloured some using the colour palette, I then filled in some of the gaps with the ghostie.


Because I wanted the card to be double sided for my lantern project I opened the work space at the bottom of the screen (click the small black arrow in the centre of it to reveal this) and then added a page to my project by clicking 'insert page'. I wanted a purple backing on my Orange design so I added a background from my Lilies and Light digi kit.


I then added the pumpkin from my Autumn Freebies embellishment kit and created a repeat pattern again using the stamp mode tool and the transparency slider. (To save these papers as Backgrounds and materials and to create a new digi kit to use again, see the instructions on my Autumn Freebie post here)


As I wanted to make 3 lanterns I added more pages to my project and used papers from my La Senora Mexicana digi kit (the sugar skulls are perfect for Halloween!) and the lime green paper from my Bizarre and Fantastic digikit.


For the handles of the lanterns I needed to create some strips with the corresponding materials. These need to be the full length of the A4 page and then cropped to a width of about 1'' (using the crop tool from the top tool bar and pushing the nodes in on the sides of the material while it was selected)


Then in the bottom project bar I clicked copy page to make an identical page of these strips.


This means I am able to add the material for the other side of the handle in the right place so when they are printed they are double sided. I added the material, dropped it to the back using the arrange tab on the bottom right corner, and then cropped the width. I left the corresponding strips slightly wider to make sure they were definitely going to print double sided.


Then I deleted the first set of strips (backspace on your keyboard while the item is selected)

I then printed the pages off, set your printer to borderless printing if you can and print pages 1,3,5 and 7 first then turn them over to print pages 2,4,6,8 on the reverse of the sheets.


While it was printing I got the centre of my lanterns ready, I have used an A4 laminate pocket for this but you could use acetate or anything else that you think will work, even just a tube of coloured card! I like the laminate pocket as I can trap my glitter inside it to make the centre of the lantern sparkle. So first I added colour with alcohol inks.


Then added the glitter!


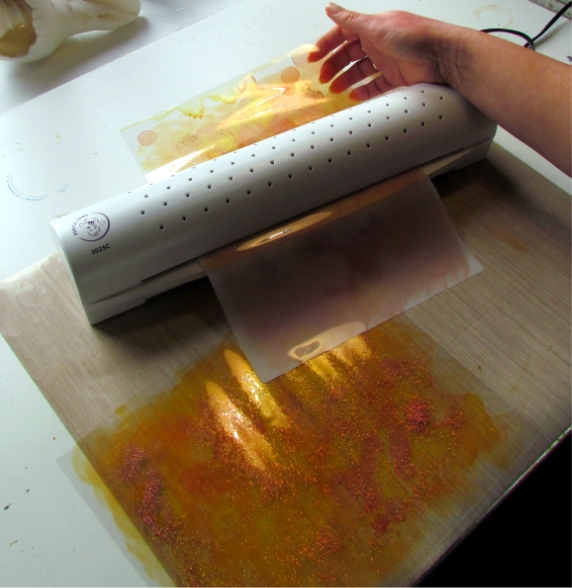
Once the alcohol ink was dry I put the pocket through my laminator. I then cut 2 of the pieces to 11'' x 7'' and one piece 11'' x 6'' (to make a squatter lantern) and then glued them into a tube with a 1/2'' overlap

Next thing is to cut your card/paper pieces to size. Cut a rectangle out of each piece 11'' x 8'' and then coming in 1/2'' all the way round mark a rectangle inside (making this inner rectangle 10'' x 7'') Then draw a vertical line within this rectangle at 1/2'' intervals, cut these lines (including the outer edge of the inner rectangle) with a craft knife and metal ruler.


So we now have all the pieces to assemble


Glue the bottom edge of one of your rectangles to one of the tubes, I used red liner tape to start with but to be honest a strong, wet glue is much easier as it is more forgiving (I found out the hard way!)
Glue the overlap that you now have down the side and then after adding glue around the top edge of your card/paper squash the lantern down and attach the top edge to the top of your tube (couldn't do pictures step by step of this, I was covered in glue!)


As I had printed on to card I curled the ends of my handle strips for added interest and then glued them to the top of my lanterns et voila ....


Some very easy but effective lanterns that look really good with battery operated tea lights in or some little fairy lights! (they also make great Christmas décor using different papers!)

2nd trick - Little treat bags

For this project I have just adapted one of the templates found in the page set up of Craft artist


Select Gift bag 5 from the Gift wrap section.


As I saved the papers I made for the lanterns into a new digi kit I have just dragged and dropped one of these onto the template, at this point that is a gift bag done! print and follow the instructions for assembly but as I said I did a bit of adapting! As I didn't intend to add a handle I didn't need the guide holes marked so wanted to remove them before printing so they didn't show. To do this go to the Layers tab on the right hand side and find the Guides in the list, you will see at the end of that line there is a visible padlock symbol, this means the layer is locked, click the padlock to unlock it.


Open the layer by clicking the drop down arrow and now you can click on one of the lines that says curves and you will see it highlight on your template, if it's something you want to lose delete it (backspace on your keyboard) do this for all the bits you don't want.


Once you've done all that click the padlock again to lock the layer and then click on Layer 1 in the list as this is the active layer that will allow us to be build up our design. I wanted to cut an aperture in my bag so I used the shape tool on the top tool bar and selected a circle to draw a shape on the front of my bag. I filled it in white so I could see it.


I then built up a design around the shape (adding shadows to the embellies with the styles tab on the right) and then turned the circle orange before printing.
I opened another project using gift bag 5 again but this time used elements from my La Senora Mexicana digi kit. I printed both projects and cut them out.


I then used a craft knife to cut out the apertures, carefully cutting around the shapes that were overlapping (although I left a border of the colour around the embellies to make it easier!)


I scored and folded all the lines as marked and added a piece of acetate to the back of the aperture.


I then stuck them together and .....


.... added some treats!

3rd trick - The last minute Halloween costume!

Well a mask .... it's a start! And a super simple one at that! These masks are created using the mask template in Craft artist in the Party Crafts section of the page set up.


Kitty cat is the lime background paper from my Bizarre and Fantastic digi kit (drag and drop it on to the template and it just fills it in!) and the tree and cat embellie from my Spooktacular freebie with an element from La Senora Mexicana for the nose! (because it is a template whatever is outside the line becomes invisible!)


And this sugar skull design is using paper and elements from my La Senora Mexicana digi kit


Print the masks off, cut out, add ribbon to wear and gems/glitter for added pizazz if you wish! Told you it was a super simple trick!

And that's it from me with this little trick and treat session, hope you have fun and get some use out of my little treat for you! Have a Happy Halloween and Seasons Greetings to you all!

Until soon, as ever,
Happy Crafting!
Love MJM x

Wednesday 26 October 2016

An Autumnal FREEBIE and tutorial - the perfect add on!

Hi all

Every Autumn that comes around I feel compelled to try and capture the colours of the season. I think the root of all this is an art class that I had at the age of 8 with Mrs Hymsworth (not sure on that spelling!) at my junior school when we had to create an Autumn picture. I remember drawing leaves and berries and learning about the highlights to make the berries look 'real' I also remember receiving a large amount of house points for my efforts! So this year I promised myself I would sit and do some drawing to capture that long ago memory .... I did! and this is what I created

 
I also decided as I had done all the doodling, drawing and colouring and converted them to Digi embellies that I would share them with all of you ..... FOR FREE ..... as a celebration of this glorious season as well as a perfect add on to my first collection of digi kits.

If you CLICK HERE you can download my doodles to use as you wish! They are in PNG format so will go into any programme you use. Before you go..... this is what will happen when you click the link ...


Go to the drop down arrow top right and click to download ... you will then get a pop up box at the bottom of your screen .....


Click the black arrow next to save to get a pop out box and click Save as .... choose where you want to save the zipped file on your computer eg my pictures ....
 
 
Close that down and then find the file on your computer, double click it to open it and then click extract all files (my computer is windows 8 I know on some older systems you would right click the file and then choose extract all files from the pop out menu) extract the files .....
 
 
and when you open the new file it will look like this ... a list of PNG's to use as you want! If you use Craft Artist this is how you can add them to a digi kit!


Open a new project in Craft Artist  ... e.g a 12 x 12 scrapbook page, do not load a digi kit (just close the digi browser) then go to tools on the top tool bar > drop down menu > Digikit creator ....
 
 
Click on Embellishments on the left > Click import >files ....
 
 
This will take you to your computer .... find the folder with my Autumn embellies ....
 
 
Select them all (click the first one, hold the shift key down ... the pointy up arrow on your keyboard ... and click the last one so they are all selected) and then click open.
 
 
They will automatically upload into the creator, click done and then you will find them in your embellishment tab to work with!
 
 
To create my layout I added my photos (add > my pictures > open) and added shadows via the style tab
 
 
I then wanted to curl the edges of the photo so while it is selected click photo lab on the secondary tool bar ...
 
 
Go to the effects tab > Style > page curl ... this travels across your picture and then you can choose it's position and move the sliders for the amount of curl, when you're happy click ok ...
 
 
As I wanted a curl top and bottom I repeated the steps above but this time added the curl to the bottom left of the photo so I had two curls.
 
 
I then started to build up my design with my embellishments using the arrange tab to move things backwards and forwards and adding shadows as I went via the style tab.
 
 
I added a background from my Sunflowers and Stars digi kit and the splat from the same kit to lift the photos (click add at the bottom of the section you want to search which will take you to your digi kit browser, click the elements you want to work with so they have a green tick, you will then find them in your work space)


 I then added the Letters from my Bizarre and Fantastic digikit for my title, arranging it as I wanted and adding shadows to make it pop.


I added a few more embellishments from my Sunflowers and Stars digi kit  (the twisted wire, leaves and sunflowers) and that was my layout complete. And now to save the digi kit to use again BUT before you do that why not create a bigger kit with it!

 
Add a background from my Sunflowers and Stars digi kit and then add some falling leaves from my doodled embellies to make a cute background paper (as well as a material) Use the stamp mode tool to make duplication easier and don't forget to add shadows to make those leaves pop!


Add a different background from Sunflowers and Stars and stamp mode leaves over it, then add another layer but this time re colour them via the colour tab ...


Continue to build the layers, using the arrange tab to send things front and back and the stamp mode to repeat until you have created your own unique pattern ...


Make as many backgrounds as you like by adding pages to your project! When your ready to save convert the designs into elements in your digi kit. Go to layers and click on the arrow next to background, select the picture that is your background 'paper' and drag it up to layer one by picking it up with a click and hold of the left button on your mouse.


Once you've done that click on anything above it to 're activate' layer one.


Zoom out via the slider in the bottom right corner to make your page small so you can draw an imaginary box around your design (make this much bigger than you think to capture everything hanging off the page) by clicking and holding the left mouse button down. When you release the mouse button the line will snap to the edges of the design > click group bottom right of the square....


Go to the top tool bar and click the crop button, grab the nodes around the side and push the line to the edge of your page....


.... Go to the transform tab on the bottom right once you have done this and check the width and height, make them both 12'' ....


Open the Background tab > click the background design with the left mouse button and hold it down > drag the background to the open background tab. You will see a plus sign below a small box on your cursor symbol when you get to the tab and the background design will jump back to the page > release the left mouse and now you will find your new background in the tab, Open the material tab and repeat to create a material from your design.


Then why not create a frame? Pick a shape from the top tool bar and draw it on you page....


Colour the line > Line tab > slider and increase the line ....


Add embellishments to build your unique design and when you're happy draw an imaginary box around it all with your cursor ....


.... and click group


As we did with the background layer, although this time after opening the frame tab, drag and drop your frame into the column and let the software generate it into an intelligent frame ...


Add your frame to the page and test it ....


You will see here after adding a photo there are gaps ..... never fear we can fix this!


Pick up the same shape tool and draw your shape over your frame keeping it within the line you want your photo to be. Open the layers tab on the right and click the arrow next to the frame picture to open up the elements of the frame.


Click on the quick shape you have drawn at the top of the layers list and holding the left mouse key down drag it down the list until it sits just above the red shape (poly curves) Then click the red shape and delete it with the back space on your computer keyboard

 
You will now see those gaps have disappeared!!


Remove the photo (select cropped item and delete it) then pick up the frame with the left mouse button and drag it into the frame tab again ...


Remove the frame above it now so you are left with the amended frame in your kit.


Go to the other tabs and remove any backgrounds/embellishments etc you don't want to save in your new kit


Now go back to your digikit creator (Top tool bar > tools > digikit creator) and an optional thing is to add your layout for the cover of your new kit >layouts > add >


>Add what you want to layouts (the first image will be your cover)


click save digi kit at the bottom ... this will take you to the files on your computer ....


.... open My documents > My digikits > name your kit and click save ....


You will now find your new kit with my Freebies and a little bit of work from you in your digi kit browser!!

PHEW! That was a bit of a mammoth post but I do hope you have fun creating with my little Autumnal freebie!!!

I can't wait to see what you create! Tag me in, or post on my page on Facebook @MJMDesign Studios .... tell all your crafty friends too and get them to like the page ;)

I'll be back soon with more inspiration and more visitors to the blog, until then, as ever,

Happy Crafting
Love
MJMx