Blimey it's cobwebby in here :) Just dropping off this post in case anyone is lurking!!
I have decided to rename this blog and send it to the land of my blogger archives! I don't want to delete it as there are some nice project posts but I won't be adding anymore content .... however I am starting a brand new blog and I will post the new name and links here as soon as I have it up and running .... see you soon! Mx
Thursday 17 May 2018
Friday 18 November 2016
An inspiring tutorial with a weekend visitor
Hi all
I am so excited to share this weekends post with you all with a whole heap of inspiration from the lovely Anne Nelson.
I have been cyber friends with Anne since the very beginning back in the days of scrapbook artist! How far we have come to Craft Artist2 professional we know today! Anne has been a great support over the years and comes up with some amazing ideas so once I saw her work with my kits I had to ask her along to the blog to share with us all!
Over to Anne
Hello folks
My name is Anne (Crafty Anne, nannyanne) and I'm a craftaholic!
I love to dabble with all things arty crafty (and have done since about the age of 4 when granny taught me to sew) and every now and again some of the things I craft actually turn out ok so was absolutely thrilled when Michelle invited me to do a bit of guest blogging about the decoupage projects I have been working on.
Michelle and I 'met' when I was asked to do a 'phone in' to Create and Craft back in the days of Digital Scrapbook Artist....I was so nervous talking on the phone to a live TV show but it really was a fun thing to do and it has been a great joy to follow Michelle's crafty journey with Serif ever since.
I had done a little bit of decoupaging using paper napkins which had worked well but I wanted something more unique and remembered about how to print onto tissue paper using an inkjet printer ...... so I had a little play with some sheets of recycled tissue that I had loads of and it worked a treat; you can see glimpses of some of my early examples in the background of some of my photos in the video.
When Michelle asked me if I would like to do a bit of guest blogging about my recent projects in the way of a tutorial I set about finding something else that I could 'upcycle' by decoupaging.
Sitting at my dressing table one morning I was looking at the pattern on the lamp thinking that the 'lily' was very much like the one I had seen in the 'Lilies and Light' digikit.......I then looked at the lampshade and there was my next decoupage project!
The tissue paper that I have printed onto for the lampshade and jars in the video was A4 size pieces that came in a pack of acetate that I had (it separated the sheets) which was white and quite thin.......it worked well but was quite delicate to use. I would suggest that you try printing onto various kinds of tissue paper to see what works best for you, your printer and its inks.
One of my other passions is taking photos ......needless to say when preparing for the decoupaging tutorial I took lots of snaps along the way and a short video/slideshow seemed to be the best way to make use of them.......making slideshows is fun too!
A word of warning.....if you have never tried decoupaging before it can be highly addictive.....oh the perils of a craftaholic. x
and this is the fabulous project she is sharing with us

 Created with my Lilies and Light digi kit
And here's the turorial

Glorious! created with my Sunflowers and Stars digi kit

Fabulous! Created with my Bizarre and Fantastic digi kit
and these


From Sunflowers and Stars

I am so excited to share this weekends post with you all with a whole heap of inspiration from the lovely Anne Nelson.
I have been cyber friends with Anne since the very beginning back in the days of scrapbook artist! How far we have come to Craft Artist2 professional we know today! Anne has been a great support over the years and comes up with some amazing ideas so once I saw her work with my kits I had to ask her along to the blog to share with us all!
Over to Anne
Hello folks
My name is Anne (Crafty Anne, nannyanne) and I'm a craftaholic!
I love to dabble with all things arty crafty (and have done since about the age of 4 when granny taught me to sew) and every now and again some of the things I craft actually turn out ok so was absolutely thrilled when Michelle invited me to do a bit of guest blogging about the decoupage projects I have been working on.
Michelle and I 'met' when I was asked to do a 'phone in' to Create and Craft back in the days of Digital Scrapbook Artist....I was so nervous talking on the phone to a live TV show but it really was a fun thing to do and it has been a great joy to follow Michelle's crafty journey with Serif ever since.
Digital crafting is a huge part of my crafty life and I am a dedicated member
of DaisyTrail where it all began for me really back in 2008. CraftArtist2
is a crafting tool that I use almost daily .......digital crafting is so quick,
clean and convenient (anytime any place kind of craft) but I do love a bit of
hybrid crafting too where you can really 'mix it up'.
Decoupaging is a craft that I have only played with briefly over the years and
it recently cropped up again as a suggestion from one of my ladies at the
weekly craft sessions that I run at my local library........I set about making
some examples in readiness for a craft session which just happened to coincide
with Michelle launching her wonderful digikits.I had done a little bit of decoupaging using paper napkins which had worked well but I wanted something more unique and remembered about how to print onto tissue paper using an inkjet printer ...... so I had a little play with some sheets of recycled tissue that I had loads of and it worked a treat; you can see glimpses of some of my early examples in the background of some of my photos in the video.
When Michelle asked me if I would like to do a bit of guest blogging about my recent projects in the way of a tutorial I set about finding something else that I could 'upcycle' by decoupaging.
Sitting at my dressing table one morning I was looking at the pattern on the lamp thinking that the 'lily' was very much like the one I had seen in the 'Lilies and Light' digikit.......I then looked at the lampshade and there was my next decoupage project!
The tissue paper that I have printed onto for the lampshade and jars in the video was A4 size pieces that came in a pack of acetate that I had (it separated the sheets) which was white and quite thin.......it worked well but was quite delicate to use. I would suggest that you try printing onto various kinds of tissue paper to see what works best for you, your printer and its inks.
One of my other passions is taking photos ......needless to say when preparing for the decoupaging tutorial I took lots of snaps along the way and a short video/slideshow seemed to be the best way to make use of them.......making slideshows is fun too!
A word of warning.....if you have never tried decoupaging before it can be highly addictive.....oh the perils of a craftaholic. x
and this is the fabulous project she is sharing with us


And here's the turorial
How amazing is that ... I LOVE it! Anne also created these

Glorious! created with my Sunflowers and Stars digi kit

Fabulous! Created with my Bizarre and Fantastic digi kit
and these


From Lilies and Light

From Sunflowers and Stars

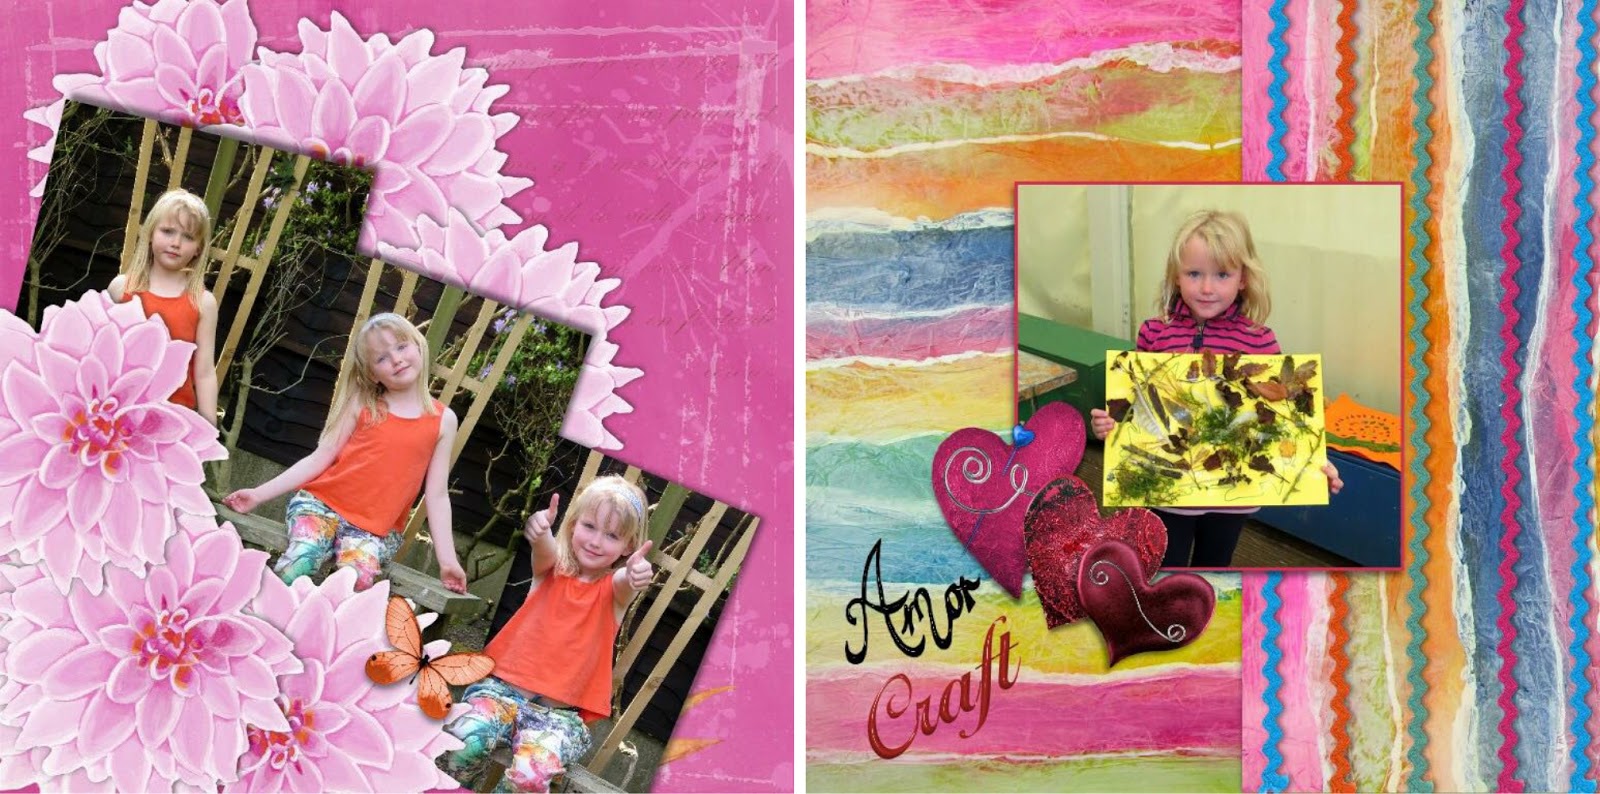
and this fab layout and story using La Senora Mexicana ..... I would have loved to have homework like this using the digi stamps in my kit! What a great page!
So what will you craft up this weekend? Thanks Anne for sharing with us and I hope you have all enjoyed the inspiration!
I'm off to pantoland this weekend .... that's a story for another post! So until I come back to share, as ever,
Happy Crafting!
Love
MJM x
Thursday 17 November 2016
Who's visiting today?
Hi all
I have another visitor to share some inspiration with you today, the lovely Sue Beasley has kindly let me show you some of the fab work she did with my kits.
I have known Sue via the wonders of cyber space for quite a while now and I absolutely love her out of the box thinking! She creates some fabulous digital creations, things that could only be done digitally and has a knack of creating things that you would never think of but make you go wow! I have also been honoured to share some of her work on Craft TV when I was demonstrating on there. If you can find her on social media check out her creative albums that she shares .... inspiration a plenty!
I asked Sue for a little intro and this is what she wrote;
and here is some of her fabby work!

These projects are created with my Lilies and Light digi kit. The use of the digi stamp on the photo of the water lily is a great idea, I love the lilypad frame that Sue created top right with the embellies in the kit, the lily bursting out of the frame bottom left is fab and the garden layout is so pretty and I love the way Sue has used the music paper as a table changing the perspective of it.

2 very different looking projects created with my La Senora Mexicana digi kit. I love the very English feel Sue has on the top layout, Sue said the images reminded her of barge painting and then the bottom layout is a master piece of paper piecing and pattern making using one of the digi stamps in the kit ... brilliantly done!

The Sunflowers and Stars digi kit has been used to create these projects. More fabulous pattern creating and blending from Sue. I love the blend of the photo on that textured material top right and the use of the paint brush embellie to 'paint' the stars!

And finally creations from my Bizarre and Fantastic digi kit. A perfect photo with the embellies on this layout.

If you haven't seen the elements in my Bizarre and Fantastic kit, this teacup is a plain white embellishment! So much work has gone into decorating it with all the individual elements and Sue has cleverly made them look like they go round the cup too!! Just amazing!

I have another visitor to share some inspiration with you today, the lovely Sue Beasley has kindly let me show you some of the fab work she did with my kits.
I have known Sue via the wonders of cyber space for quite a while now and I absolutely love her out of the box thinking! She creates some fabulous digital creations, things that could only be done digitally and has a knack of creating things that you would never think of but make you go wow! I have also been honoured to share some of her work on Craft TV when I was demonstrating on there. If you can find her on social media check out her creative albums that she shares .... inspiration a plenty!
I asked Sue for a little intro and this is what she wrote;
I`m a hobby crafter - mainly
digital & die cutting due to lack of space to play in or get messy in sadly!
I love all types of photographs & all types of kits and enjoy looking for unusual
ways to use them. I love making 3D cards, though I`m no expert.
I enjoyed MJM’s kits immensely as
they were so different to `the norm` and I thought Linda Wallace’s 3D card tutorial
that she shared on the blog was genius.
and here is some of her fabby work!

These projects are created with my Lilies and Light digi kit. The use of the digi stamp on the photo of the water lily is a great idea, I love the lilypad frame that Sue created top right with the embellies in the kit, the lily bursting out of the frame bottom left is fab and the garden layout is so pretty and I love the way Sue has used the music paper as a table changing the perspective of it.

2 very different looking projects created with my La Senora Mexicana digi kit. I love the very English feel Sue has on the top layout, Sue said the images reminded her of barge painting and then the bottom layout is a master piece of paper piecing and pattern making using one of the digi stamps in the kit ... brilliantly done!

The Sunflowers and Stars digi kit has been used to create these projects. More fabulous pattern creating and blending from Sue. I love the blend of the photo on that textured material top right and the use of the paint brush embellie to 'paint' the stars!

And finally creations from my Bizarre and Fantastic digi kit. A perfect photo with the embellies on this layout.

If you haven't seen the elements in my Bizarre and Fantastic kit, this teacup is a plain white embellishment! So much work has gone into decorating it with all the individual elements and Sue has cleverly made them look like they go round the cup too!! Just amazing!

And Sue's last layout made me squeal with delight when I saw it! Sue has a love for Greece and it shines through with this project with the embellies all being re coloured and the use of the trees on the hill, the detail is fabulous!
I hope you have enjoyed Sue's work and that it has given you some different ideas to help you think out of the box too! Her work certainly makes me realise that there is so much even I don't know about the Craft Artist software!
Thanks for stopping by, I'll see you at the weekend for another visitor with a fab tutorial too! Until then, as ever,
Happy Crafting!
Love
MJM x
Tuesday 15 November 2016
Who's visiting today?
Hi all
Today we have the lovely Audrey Whittaker visiting the blog. I 'met' Audrey in cyber space through Daisy Trail when I first started demonstrating the Serif software on Craft TV. She has been a great support on my journey along the way and never more so than with the launch of my own digi kits!
I asked Audrey to give us a little intro and this is what she said;
I am married with two grown up children and one grandchild. I live in North West England and I am now retired but used to run my own business selling foundation wear and lingerie. I play golf and have served on many club committees, I was honoured to be Lady Captain in 2011 and had a ball!

I love the layering and blending on these two pieces created with my Lilies and Light digi kit


These creations are made with my Bizarre and Fantastic kit and I love that they all look completely different. I really like the black background with the dancing figures, it makes them really pop and the added décor on the plain tea set in the kit is fab.


Two lovely layouts created with my La Senora Mexicana kit, the pictures are perfect and clever layering of the Dahlia embellie on the left frames the pictures beautifully.

These fab projects are created with my Sunflower and Stars digi kit and all look so different. The Iris embellies on the textured background are really striking and would make a great framed piece of home décor I think.

This would look fab in a frame too ... like the modern version of Vincent's sunflowers! I love that Audrey has used the blue vase on the blue background, it makes the photo real sunflowers in the kit really pop.


Today we have the lovely Audrey Whittaker visiting the blog. I 'met' Audrey in cyber space through Daisy Trail when I first started demonstrating the Serif software on Craft TV. She has been a great support on my journey along the way and never more so than with the launch of my own digi kits!
I asked Audrey to give us a little intro and this is what she said;
I am married with two grown up children and one grandchild. I live in North West England and I am now retired but used to run my own business selling foundation wear and lingerie. I play golf and have served on many club committees, I was honoured to be Lady Captain in 2011 and had a ball!
I have always enjoyed crafting,
sewing and knitting and use Craft Artist to add to my crafting fun as well as
to produce art work for social events including table and name cards and
seating plans. I love being a member at Daisy Trail and to be honest I’m not
sure how I ever managed to find the time to work as now a days I don’t seem to
have any spare time!
And here is some of the lovely work Audrey has created with my kits
I love the layering and blending on these two pieces created with my Lilies and Light digi kit

And I love the perspective that Audrey has created on this layout, building up the 'frame' of poppies in the foreground with the flower pots and elements from the kit looking through into that fabulous blended photo on the background.

These creations are made with my Bizarre and Fantastic kit and I love that they all look completely different. I really like the black background with the dancing figures, it makes them really pop and the added décor on the plain tea set in the kit is fab.

This layout makes me smile and what a brilliant use of the oriental bridge embellie in the kit to accent the shapes on the background.
Two lovely layouts created with my La Senora Mexicana kit, the pictures are perfect and clever layering of the Dahlia embellie on the left frames the pictures beautifully.

These fab projects are created with my Sunflower and Stars digi kit and all look so different. The Iris embellies on the textured background are really striking and would make a great framed piece of home décor I think.

This would look fab in a frame too ... like the modern version of Vincent's sunflowers! I love that Audrey has used the blue vase on the blue background, it makes the photo real sunflowers in the kit really pop.

And this layout is magical! The perspectives on the elements are brilliant, I love the blended background and the photo on paper stack embellie is inspired! Love it!

And finally a collection of cards that Audrey created .... fabulous!
I hope you've enjoyed your stroll through Audrey's creations and feel inspired to give some of the ideas a go, I know I do!
I will love you and leave you for now. I hope you're well and happy, until soon, as ever,
Happy Crafting!
Love
MJMx
Saturday 12 November 2016
A quick make and take with a weekend visitor
Hi all
I hope this blog post finds you well and happy and keeping warm now that the weather has definitely turned to a more wintery feel .... brrrr! To keep you warm in your craft spaces this weekend I have a visitor for you, the lovely Anita Hitchmough, and she has kindly given me a lovely little project to share with you all too which I think is perfect for gifting filled with goodies, especially with Christmas coming!
I asked Anita to say a few words to introduce herself:

Some great projects created with the Lilies and Light digi kit, the Wysteria on the purple background looks yummy!


Next we have some lovely projects from the Sunflowers and Stars digi kit. Nita has used the door embellishments to great effect on the left layout and the shadows on the chairs are fab! I want to go and sit there and look at that view! And the photo in the envelope frame is just perfect!

The door hanger looks fantastic, what a great gift! and the pop up box of sunflowers just makes me smile.


And finally some gorgeous projects created with the La Senora Mexicana digi kit. I love the shaped mat Nita has created for the layout.


and then there is this! How effective and what a great gift filled with goodies. Nita has put choccies in her basket but it could be smellies, make up, miniatures of whiskey anything that fits really! And it could be made in any colour with any kit and with any decorations you fancy especially if you have the instructions, which Nita has kindly shared with us, and you can download them here (click on the link, click on the download arrow and in the pop up box at the bottom of your screen click the black arrow next to save then in the pop out box click 'save as' to save where you want to on your computer!)
I've enjoyed sharing Anita's work with you all and hope you've enjoyed seeing it, I hope you have fun crafting up that little gift basket make and take too!
I hope you all have a great weekend! Until soon, as ever,
Happy Crafting!
Love
MJMx
I hope this blog post finds you well and happy and keeping warm now that the weather has definitely turned to a more wintery feel .... brrrr! To keep you warm in your craft spaces this weekend I have a visitor for you, the lovely Anita Hitchmough, and she has kindly given me a lovely little project to share with you all too which I think is perfect for gifting filled with goodies, especially with Christmas coming!
I asked Anita to say a few words to introduce herself:
Hi I'm Anita ('Nita) a wife, Mum to one daughter, and Oma ((Dutch for
Nana) to 4 year old George. I am also a CAP addict. This was all Michelle's
fault!! after finding her demoing on Create and Craft over 4 years ago, I
bought it, recorded every programme she did, joined a Facebook group and bought
a note book to jot down tips, and then started to play. Lots were binned! but I
loved trying and learning. The group ethos was to encourage each other and
learn. I eventually gained confidence and started to post my scrap pages and
cards in there. So here I am all those years later still loving it and
learning. Then whilst on holiday in Devon I got a PM from Michelle asking me if
I would like to do some samples for her new kits she had designed. Well to say
my gast was flabbered would be an understatement and I said yes please. I
arrived home and the 4 vibrant, different and luscious packs inspired by
artists, were waiting for me, oh my what fun I had and some 18 projects later
the ideas are still flowing. I have tried to do some simple ones and some a
little more involved, trying to reach out to as many as possible, at whatever
stage you are with your Capping, these are such versatile kits that you are
sure to love them too
And here's some of her lovely work!
When I have a new kit, like a lot of us the temptation is to delve straight in
- after watching and listening to Michelle whilst she was demoing ,she always
advised check those kits out first, so that is how I work, patience is a
virtue ! I drag all the backgrounds onto my page first, then embellies - that's
how I see whats there and where ideas spring from. Next check out brushes,
layouts alphas etc. I love to make scrap pages, cards and gifts so my samples
are a mix of all, make the most of your kits ! and these are soooooo versatile,
and inspiring, you will be returning to them time and time again x
And here's some of her lovely work!

Some great projects created with the Lilies and Light digi kit, the Wysteria on the purple background looks yummy!

... this wall hanging makes a fabulous piece of home décor

and I love this layout using one of my favourite backgrounds from Lilies and Light, that photo blend is superb!

These projects are created with the Bizarre and Fantastic digi kit. The circle topper on the Jazz card is really clever, matching the patterns to continue them from the topper to the background and I really like the colour change on the new home card, it really works and looks very Art Deco!
Next we have some lovely projects from the Sunflowers and Stars digi kit. Nita has used the door embellishments to great effect on the left layout and the shadows on the chairs are fab! I want to go and sit there and look at that view! And the photo in the envelope frame is just perfect!

The door hanger looks fantastic, what a great gift! and the pop up box of sunflowers just makes me smile.

And this glorious layout .... I could look at this all day!

And finally some gorgeous projects created with the La Senora Mexicana digi kit. I love the shaped mat Nita has created for the layout.


and then there is this! How effective and what a great gift filled with goodies. Nita has put choccies in her basket but it could be smellies, make up, miniatures of whiskey anything that fits really! And it could be made in any colour with any kit and with any decorations you fancy especially if you have the instructions, which Nita has kindly shared with us, and you can download them here (click on the link, click on the download arrow and in the pop up box at the bottom of your screen click the black arrow next to save then in the pop out box click 'save as' to save where you want to on your computer!)
I've enjoyed sharing Anita's work with you all and hope you've enjoyed seeing it, I hope you have fun crafting up that little gift basket make and take too!
I hope you all have a great weekend! Until soon, as ever,
Happy Crafting!
Love
MJMx
Wednesday 9 November 2016
A token of Remembrance and a quick tutorial
Hi all
I thought it was about time I appeared back on my blog :D It's been great to have visitors and I'm glad you've all been enjoying the inspiration.
I have been loving seeing the poppies I created for my Lilies and Light digi kit used a lot in so many different projects on social media, especially as it's the time of year we all wear one with pride so I decided last night to have a little experiment and this is what I came up with


Clicking select to de activate the eraser tool and select my image again I picked up the scissor tool so I could separate the flower and the leaf.

Using the scissor tool in this way you only need to cut part way into the selected item (not from one side to another as normal) as long as you cut through the select line around the image ...
.... You will find the image comes apart! (Click on select to de activate the tool and click off the image before selecting the separate elements again) I then decided on the size of my poppy changing the size by pulling out the corner nodes, you will see measurements appear round the edge of the select box as you do this and will also see the size in the transform tab so you can get it exactly as you want it. I made mine about 4'' in width.

I resized the leaf in the same way and right click and copied it to add more, the great thing with it being digital you can put the arrangement together on the page to see that it works before printing the elements so you don't waste anything!

Once I was happy with the size of the elements I arranged my page for printing. I used the stamp mode tool to make multiple images and arranged everything on the page to use the printable cotton in the best way possible, I also printed an extra flower and an extra leaf as I had space, just in case I needed them.

Once I had printed my page I cut out the elements in a decoupage fashion to create layers for my poppy.

I then curled the edges of the cotton, it holds surprisingly well! and stuck the layers together with a white tacky glue, just adding the glue around the middle area of the pieces so the edges stay free ...

.... and then cut an oval of felt for the back. I stitched a safety pin to this before gluing it in place (this also added extra stability to the brooch)

I then added some glitter glue to the middle for some added sparkle!


... to this

Well that's all from me this visit, thanks for stopping by and I will be back soon with some more visitors and some more projects. Until then, as ever,
Happy Crafting
Love
MJMx
I thought it was about time I appeared back on my blog :D It's been great to have visitors and I'm glad you've all been enjoying the inspiration.
I have been loving seeing the poppies I created for my Lilies and Light digi kit used a lot in so many different projects on social media, especially as it's the time of year we all wear one with pride so I decided last night to have a little experiment and this is what I came up with

A brooch made from printable cotton! This is how I did it

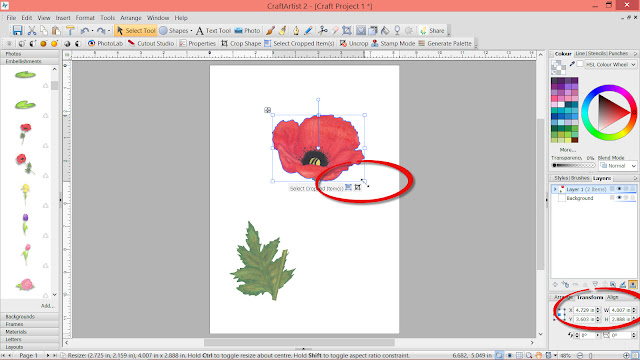
I used an A4 page set up in my Craft Artist 2 professional software (if you don't have it remember you can get the compact version for FREE to get access to my art work and create this project!) and loaded my Lilies and Light digi kit. I added the poppy I wanted to work with and while it was selected on my workspace I picked up the eraser tool and erased away bits of the stem I didn't want.

Clicking select to de activate the eraser tool and select my image again I picked up the scissor tool so I could separate the flower and the leaf.

Using the scissor tool in this way you only need to cut part way into the selected item (not from one side to another as normal) as long as you cut through the select line around the image ...

.... You will find the image comes apart! (Click on select to de activate the tool and click off the image before selecting the separate elements again) I then decided on the size of my poppy changing the size by pulling out the corner nodes, you will see measurements appear round the edge of the select box as you do this and will also see the size in the transform tab so you can get it exactly as you want it. I made mine about 4'' in width.

I resized the leaf in the same way and right click and copied it to add more, the great thing with it being digital you can put the arrangement together on the page to see that it works before printing the elements so you don't waste anything!

Once I was happy with the size of the elements I arranged my page for printing. I used the stamp mode tool to make multiple images and arranged everything on the page to use the printable cotton in the best way possible, I also printed an extra flower and an extra leaf as I had space, just in case I needed them.

Once I had printed my page I cut out the elements in a decoupage fashion to create layers for my poppy.

I then curled the edges of the cotton, it holds surprisingly well! and stuck the layers together with a white tacky glue, just adding the glue around the middle area of the pieces so the edges stay free ...

.... and then cut an oval of felt for the back. I stitched a safety pin to this before gluing it in place (this also added extra stability to the brooch)

I then added some glitter glue to the middle for some added sparkle!

I'm really pleased with the finished piece, I will of course donate to the poppy appeal as normal and will definitely be wearing my poppy with pride!
I love that digi crafting can allow me to do things like this, to choose the size I want my images to be and to choose the medium it is on and I am really rather tickled that my art can go from this ....

... to this

Well that's all from me this visit, thanks for stopping by and I will be back soon with some more visitors and some more projects. Until then, as ever,
Happy Crafting
Love
MJMx
Tuesday 8 November 2016
An inspirational visitor
Hi all
Today I would like to introduce you to the inspirational Marc Stevens.
Marc is one of my very good friends, we met once in real life at one of the Olympia craft shows I did, but have got to know each other through the wonders of Social Media. He is funny, loving and talented and my life is richer for him being in it. Marc has been involved in the arts and design industry for a long time, in all guises, including exhibition work and art installations and he works to help others, encouraging and supporting people in the industry, including little old me!
He has fabulous ideas for creations and drops them off on my Facebook posts every now and then so keep your eye out! I have been trying to gather them and will certainly be trying some out!
Here is a bit he wrote for me to inspire you all
when deciding on a project to create with my kits:
There
are so many amazing papers you can now print on to from canvas, decal, tissue,
mat, gloss, textured, acetate even felt paper! Also don’t forget about products
you can use on cotton that make it react like paper so you can print on to it
to use in all your fabric crafts like Terial Magic, I have used this and found
it works really well but there are other ways just take a look on you tube.
Don’t
underestimate good old fashioned carbon paper either , tracing paper or wax
paper to transfer your designs on to things especially as Michelle has done so many line
drawings in all her kits, these materials are great for transferring on to tote
bags and canvas cushions, t shirts and jeans etc. You can then colour them in
using fabric paints, pens, inks.
If
you have an electronic cutting machine (like a silhouette or a scan and cut) you
can get it to cut out things from the kits for you! There is lots of info on
daisy trail and you tube to help you with this. You can make your own stencils
using the art work in the kits and digitally with the stencil maker in CraftArtist2
Professional.
The
kits just keep on giving! You can even print on to acetate and use a projector
to project the art work on to walls, trace around it and paint and hey ho your
own Mural! The art work in the kits want you to use them.
Big
love Marc
And
here are some ideas in pictures!

Well
I don’t know about you but my head is spinning with ideas for projects! It’s
amazing isn’t it how other people can think of things that you may not have
thought of, or indeed techniques you have forgotten about to spark that
creative imagination!
I
hope you feel inspired to have a go at some of the ideas Marc has shared with
us, he’s Fab isn’t he!
Thanks
for stopping by, until soon, as ever
Happy
Crafting
Love
MJMx
Subscribe to:
Posts (Atom)