I thought it was about time I appeared back on my blog :D It's been great to have visitors and I'm glad you've all been enjoying the inspiration.
I have been loving seeing the poppies I created for my Lilies and Light digi kit used a lot in so many different projects on social media, especially as it's the time of year we all wear one with pride so I decided last night to have a little experiment and this is what I came up with
A brooch made from printable cotton! This is how I did it
I used an A4 page set up in my Craft Artist 2 professional software (if you don't have it remember you can get the compact version for FREE to get access to my art work and create this project!) and loaded my Lilies and Light digi kit. I added the poppy I wanted to work with and while it was selected on my workspace I picked up the eraser tool and erased away bits of the stem I didn't want.
Clicking select to de activate the eraser tool and select my image again I picked up the scissor tool so I could separate the flower and the leaf.
Using the scissor tool in this way you only need to cut part way into the selected item (not from one side to another as normal) as long as you cut through the select line around the image ...
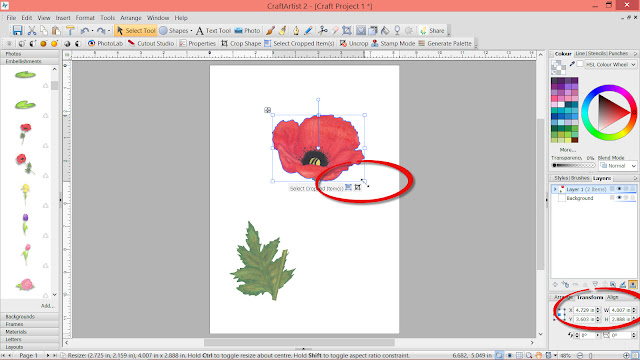
.... You will find the image comes apart! (Click on select to de activate the tool and click off the image before selecting the separate elements again) I then decided on the size of my poppy changing the size by pulling out the corner nodes, you will see measurements appear round the edge of the select box as you do this and will also see the size in the transform tab so you can get it exactly as you want it. I made mine about 4'' in width.
I resized the leaf in the same way and right click and copied it to add more, the great thing with it being digital you can put the arrangement together on the page to see that it works before printing the elements so you don't waste anything!
Once I was happy with the size of the elements I arranged my page for printing. I used the stamp mode tool to make multiple images and arranged everything on the page to use the printable cotton in the best way possible, I also printed an extra flower and an extra leaf as I had space, just in case I needed them.
Once I had printed my page I cut out the elements in a decoupage fashion to create layers for my poppy.
I then curled the edges of the cotton, it holds surprisingly well! and stuck the layers together with a white tacky glue, just adding the glue around the middle area of the pieces so the edges stay free ...
.... and then cut an oval of felt for the back. I stitched a safety pin to this before gluing it in place (this also added extra stability to the brooch)
I then added some glitter glue to the middle for some added sparkle!
I'm really pleased with the finished piece, I will of course donate to the poppy appeal as normal and will definitely be wearing my poppy with pride!
I love that digi crafting can allow me to do things like this, to choose the size I want my images to be and to choose the medium it is on and I am really rather tickled that my art can go from this ....
... to this
Well that's all from me this visit, thanks for stopping by and I will be back soon with some more visitors and some more projects. Until then, as ever,
Happy Crafting
Love
MJMx


Beautiful M. ....a great tut too.
ReplyDeleteBeautiful and another great tutorial thank you x
ReplyDeleteAnother brilliant tut, thank you for the inspiration.
ReplyDeleteWhat a great idea beautifully done x
ReplyDeletefab love this great on acetate as well going to print some on acetate and then use gilding flakes on them and use as christmas flowers in a door wreath love the tut big love marc
ReplyDeleteLOVE that idea! Mx
Delete