
Every Autumn that comes around I feel compelled to try and capture the colours of the season. I think the root of all this is an art class that I had at the age of 8 with Mrs Hymsworth (not sure on that spelling!) at my junior school when we had to create an Autumn picture. I remember drawing leaves and berries and learning about the highlights to make the berries look 'real' I also remember receiving a large amount of house points for my efforts! So this year I promised myself I would sit and do some drawing to capture that long ago memory .... I did! and this is what I created

If you CLICK HERE you can download my doodles to use as you wish! They are in PNG format so will go into any programme you use. Before you go..... this is what will happen when you click the link ...

Go to the drop down arrow top right and click to download ... you will then get a pop up box at the bottom of your screen .....

Click the black arrow next to save to get a pop out box and click Save as .... choose where you want to save the zipped file on your computer eg my pictures ....

Close that down and then find the file on your computer, double click it to open it and then click extract all files (my computer is windows 8 I know on some older systems you would right click the file and then choose extract all files from the pop out menu) extract the files .....

and when you open the new file it will look like this ... a list of PNG's to use as you want! If you use Craft Artist this is how you can add them to a digi kit!

Open a new project in Craft Artist ... e.g a 12 x 12 scrapbook page, do not load a digi kit (just close the digi browser) then go to tools on the top tool bar > drop down menu > Digikit creator ....

Click on Embellishments on the left > Click import >files ....

This will take you to your computer .... find the folder with my Autumn embellies ....

Select them all (click the first one, hold the shift key down ... the pointy up arrow on your keyboard ... and click the last one so they are all selected) and then click open.
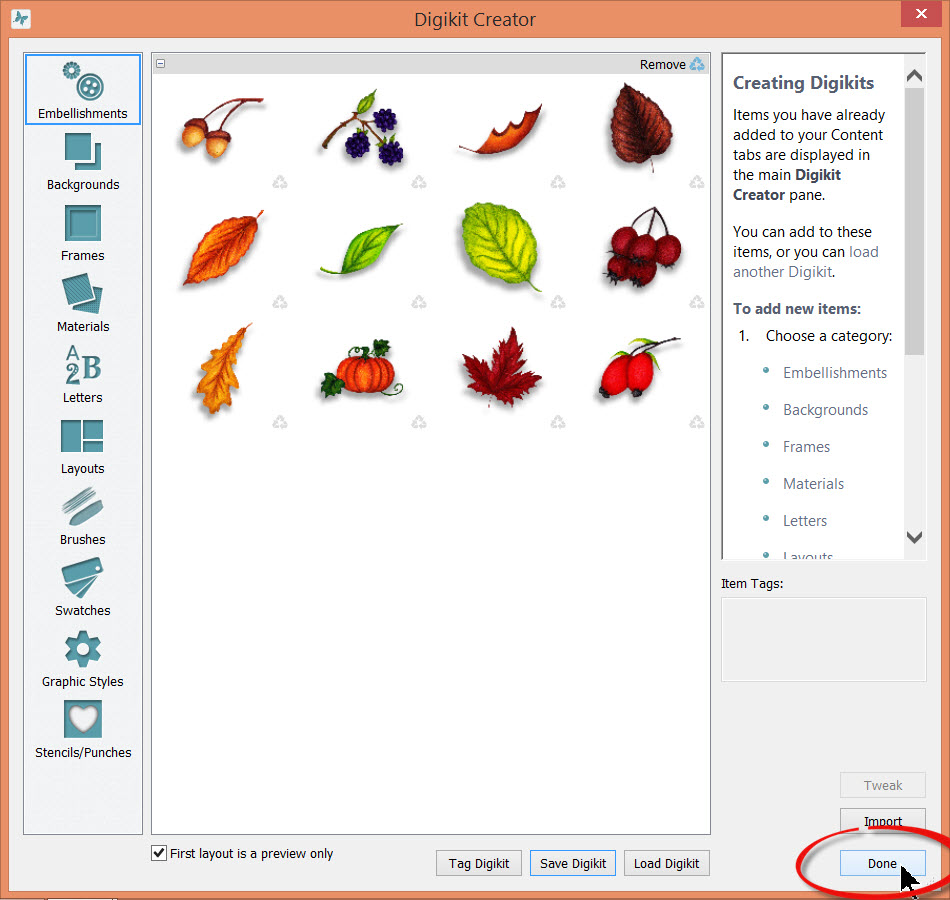
They will automatically upload into the creator, click done and then you will find them in your embellishment tab to work with!

To create my layout I added my photos (add > my pictures > open) and added shadows via the style tab

I then wanted to curl the edges of the photo so while it is selected click photo lab on the secondary tool bar ...

Go to the effects tab > Style > page curl ... this travels across your picture and then you can choose it's position and move the sliders for the amount of curl, when you're happy click ok ...

As I wanted a curl top and bottom I repeated the steps above but this time added the curl to the bottom left of the photo so I had two curls.

I then started to build up my design with my embellishments using the arrange tab to move things backwards and forwards and adding shadows as I went via the style tab.

I added a background from my Sunflowers and Stars digi kit and the splat from the same kit to lift the photos (click add at the bottom of the section you want to search which will take you to your digi kit browser, click the elements you want to work with so they have a green tick, you will then find them in your work space)

I then added the Letters from my Bizarre and Fantastic digikit for my title, arranging it as I wanted and adding shadows to make it pop.

I added a few more embellishments from my Sunflowers and Stars digi kit (the twisted wire, leaves and sunflowers) and that was my layout complete. And now to save the digi kit to use again BUT before you do that why not create a bigger kit with it!

Add a background from my Sunflowers and Stars digi kit and then add some falling leaves from my doodled embellies to make a cute background paper (as well as a material) Use the stamp mode tool to make duplication easier and don't forget to add shadows to make those leaves pop!

Add a different background from Sunflowers and Stars and stamp mode leaves over it, then add another layer but this time re colour them via the colour tab ...

Continue to build the layers, using the arrange tab to send things front and back and the stamp mode to repeat until you have created your own unique pattern ...

Make as many backgrounds as you like by adding pages to your project! When your ready to save convert the designs into elements in your digi kit. Go to layers and click on the arrow next to background, select the picture that is your background 'paper' and drag it up to layer one by picking it up with a click and hold of the left button on your mouse.

Once you've done that click on anything above it to 're activate' layer one.

Zoom out via the slider in the bottom right corner to make your page small so you can draw an imaginary box around your design (make this much bigger than you think to capture everything hanging off the page) by clicking and holding the left mouse button down. When you release the mouse button the line will snap to the edges of the design > click group bottom right of the square....

Go to the top tool bar and click the crop button, grab the nodes around the side and push the line to the edge of your page....

.... Go to the transform tab on the bottom right once you have done this and check the width and height, make them both 12'' ....

Open the Background tab > click the background design with the left mouse button and hold it down > drag the background to the open background tab. You will see a plus sign below a small box on your cursor symbol when you get to the tab and the background design will jump back to the page > release the left mouse and now you will find your new background in the tab, Open the material tab and repeat to create a material from your design.

Then why not create a frame? Pick a shape from the top tool bar and draw it on you page....

Colour the line > Line tab > slider and increase the line ....

Add embellishments to build your unique design and when you're happy draw an imaginary box around it all with your cursor ....

.... and click group

As we did with the background layer, although this time after opening the frame tab, drag and drop your frame into the column and let the software generate it into an intelligent frame ...

Add your frame to the page and test it ....

You will see here after adding a photo there are gaps ..... never fear we can fix this!

Pick up the same shape tool and draw your shape over your frame keeping it within the line you want your photo to be. Open the layers tab on the right and click the arrow next to the frame picture to open up the elements of the frame.

Click on the quick shape you have drawn at the top of the layers list and holding the left mouse key down drag it down the list until it sits just above the red shape (poly curves) Then click the red shape and delete it with the back space on your computer keyboard

You will now see those gaps have disappeared!!

Remove the photo (select cropped item and delete it) then pick up the frame with the left mouse button and drag it into the frame tab again ...

Remove the frame above it now so you are left with the amended frame in your kit.

Go to the other tabs and remove any backgrounds/embellishments etc you don't want to save in your new kit

Now go back to your digikit creator (Top tool bar > tools > digikit creator) and an optional thing is to add your layout for the cover of your new kit >layouts > add >

>Add what you want to layouts (the first image will be your cover)

click save digi kit at the bottom ... this will take you to the files on your computer ....

.... open My documents > My digikits > name your kit and click save ....

You will now find your new kit with my Freebies and a little bit of work from you in your digi kit browser!!
PHEW! That was a bit of a mammoth post but I do hope you have fun creating with my little Autumnal freebie!!!
I can't wait to see what you create! Tag me in, or post on my page on Facebook @MJMDesign Studios .... tell all your crafty friends too and get them to like the page ;)
I'll be back soon with more inspiration and more visitors to the blog, until then, as ever,
Happy Crafting
Love
MJMx
Superb freebies and such useful tutorials, thank you Michelle x
ReplyDeleteGlad you enjoyed Celia! M x
Deletefab fab fab i love the kit and thankyou so much the tutorials are so helpful and make you want to do so much more thankyou pal big love marc
ReplyDeleteYou're so welcome lovely M x
DeleteWow! super freebies and a great tutorial post!
ReplyDeleteYou're welcome Lovely lady M x
DeleteOnly just spotted the Autumn Freebie, it's lovely and I quickly made a pretty scene with Serif's Affinity Designer. Thanks, Michelle :)
ReplyDelete